
StarQuest Technical Documents
Quick Start Guide to Using SQDR
Last Update: 07 June 2021
Product: SQDR
Version: 4.50 or later
Article ID: SQV00PU008-XX
Abstract
This Quick Start Guide describes how to install and configure the software you need, including the StarSQL ODBC driver for Db2, to perform snapshot replication operations using the StarQuest Data Replicator (SQDR). Read the complete document before starting your installation.
Note: if you require incremental replication support from a supported database (Db2 for i, Db2 for LUW, SQL Server, Oracle, MySQL, Informix) using SQDR Plus, refer to the SQDR Plus Quick Start Guide.
This document is intended for first-time users of SQDR. Users who are upgrading an existing installation should refer to the SQDR Release Notes and the SQDR online help for upgrade instructions.
The estimated time to complete all tasks is 1 hour.
General considerations
The same individual or a combination of individuals must be capable of performing in the following three roles in order to successfully complete the evaluation.
- Tier 1 Database Administrator (Db2 Administrator) is someone with administrative authority on the Tier 1 source system.
- Tier 3 Administrator is someone with administrative authority to install SQDR on a Windows computer. This person must also have a set of Db2 user credentials that provide adequate authority to work with the libraries and tables you want to replicate.
The Windows client platform that will run SQDR must have:
- TCP/IP access to the source database host and the destination database.
- Access to Microsoft SQL Server to be used for the SQDR control database.
SQL Server considerations
- In the following example, SQDR uses a SQL Server database to store replication subscription information. If you do not already have a SQL Server installation, you can obtain the Microsoft SQL Server Express Edition free of charge from Microsoft to use as a control database for the Data Replicator. The StarQuest Technical Document Installing SQL Server for a Control Database provides details for using SQL Server Express with SQDR.
- Using a tool such as SQL Server Management Studio, odbctest, or other tools, create a database. We recommend using the name ControlDB.
- Depending on the type of authentication that is configured for the SQL Server, you must have a SQL Server user ID (if using SQL Server and Windows authentication) or a Windows user ID (if using Windows-only authentication) that has dbo authority in the database. This could also be a user that is a member of the System Administrators (sysadmin) server role.
If you are using Windows authentication (Integrated Security) and the SQDR service is running as Local System Administrator, you may need to add the user NT AUTHORITY\SYSTEM (local SQL Server) or the machine account (MyDomain\MySQDRMachine$, where MyDomain is the domain and MySQDRMachine is the name of the system running SQDR) for a remote SQL Server instance.
Summary of tasks
Perform the tasks in the order described, noting that some provide information used in subsequent steps. The detailed instructions for each task follow this summary.
- Db2 Administrator: If the source system is Db2, use StarAdmin to bind SQL packages in the database. This requires knowledge of the database host and sufficient user privilege. Provide database connectivity information to the Client-Platform Administrator to be used when configuring a source.
- Client-Platform Administrator:
- Download SQDR and install the software. This installation includes the StarSQL ODBC driver.
- Install ODBC drivers for source and destination databases if necessary, and determine connection strings for the source and destination databases.
- License the software.
- Run the SQDR configuration, connecting to the SQL Server database created to serve as the control database.
- Configure snapshot replication subscripotions and (if desired) groups.
- Review the subscription status.
Step 1: (Db2 Administrator task) Download and Install StarAdmin (Db2 source only)
Estimated Time: 10 minutes
Download StarAdmin to a temporary directory, unblock the zip file if necessary, expand the zip file, and install the software using the instructions below.
- Log on as an administrative user.
- Execute setup.exe to launch the installer.
- On the Welcome dialog, click Next.
- Accept the License Agreement and click Next.
- Accept to install StarAdmin in the default directory of C:\Program Files\StarQuest\StarAdmin or browse to select an alternate directory. Click Next to continue.
- Click Install to begin the installation or click the Back button to make any changes.
- After the installation is complete, click Finish.
StarAdmin will be used in the next step to bind StarSQL host packages.
Step 2: (Db2 Administrator task) Bind Host Packages Using StarAdmin
Estimated Time: 15 minutes
The database connectivity information collected in this section should be provided later to the SQDR Client-Platform Administrator for use in creating ODBC connection strings or data sources.
- Collect the Db2 host information and fill in the values for your environment in the space provided in the table below.
Connection Parameter Description Your Value Host The network Host Name or IP address of the Db2 server. Port The port number on which Db2 listens for connection requests, as determined during the pre-installation tasks.
Database Name The name of the source Db2 database.
Package Collection Set this value to SQDR or QGPL
SQDR or QGPL Username/Password A Db2 user account that has authority to create and bind packages in the SQDR collection. - If the source system is running Db2 for i, create a library (package collection) with CRTLIB SQDR. Alternatively, you can place packages in QGPL.
- Start the StarAdmin application from the StarAdmin program group.
- Enter the database connectivity values in the Connection Settings dialog and click OK.
- Upon connecting successfully, StarAdmin will immediately bind one package, which will be displayed in the package list. The status bar at the bottom of the dialog will display the Database Name, Package Collection, Db2 Type, and Version. If StarAdmin fails to connect to the database, review the suggested resolutions in the Common Error Messages section of the StarQuest technical document Binding StarSQL Packages Using StarAdmin and make any necessary corrections to the values in the connection dialog.
- Leave the default values for the Package Settings and Grant Options.
- From the Command menu, select Bind to create and bind the remaining packages.
- Once the bind package operation has completed, review the summary dialog. If the packages are created and bound successfully, the summary output will look similar to the following:
Package binding starting: Wed Jul 29 14:44:03 PDT 2009
UID=SUPERUSER
HostName=DB2HOST.DOMAIN.COM
Port=446
Server=DB2PROD
PkgColID=SQDR
AutoTypDefOvr=
BindRules=RUN
CustomizePrdid=No
UseJumboPackages=No
UseEncryption=Anyjdbc:StarSQL_JDBC://DB2HOST.DOMAIN.COM:446/DB2PROD;collection=SQDR
SQL package SWNC0000 in collection SQDR has been created.
Granted execute privileges on SQDR.SWNC0000 to PUBLIC
SQL package SWRU0000 in collection SQDR has been created.
Granted execute privileges on SQDR.SWRU0000 to PUBLIC
SQL package SWRC0000 in collection SQDR has been created.
Granted execute privileges on SQDR.SWRC0000 to PUBLIC
SQL package SWRR0000 in collection SQDR has been created.
Granted execute privileges on SQDR.SWRR0000 to PUBLIC
SQL package SWTS0000 in collection SQDR has been created.
Granted execute privileges on SQDR.SWTS0000 to PUBLIC
SQL package SWNC1000 in collection SQDR has been created.
Granted execute privileges on SQDR.SWNC1000 to PUBLIC
SQL package SWRU1000 in collection SQDR has been created.
Granted execute privileges on SQDR.SWRU1000 to PUBLIC
SQL package SWRC1000 in collection SQDR has been created.
Granted execute privileges on SQDR.SWRC1000 to PUBLIC
SQL package SWRR1000 in collection SQDR has been created.
Granted execute privileges on SQDR.SWRR1000 to PUBLIC
SQL package SWTS1000 in collection SQDR has been created.
Granted execute privileges on SQDR.SWTS1000 to PUBLIC
SQL package QSYS2 in collection SQDR has been created.
Granted execute privileges on SQDR.QSYS2 to PUBLICPackage binding completed: Wed Jul 29 14:44:55 PDT 2009
If any errors are reported, review the suggested resolutions in the Common Error Messages section of the StarQuest technical document Binding StarSQL Packages Using StarAdmin, correct the problem and execute the bind operation again. If you are unable to resolve the error condition, copy the entire Summary text and send it to StarQuest Customer Support at support@starquest.com.
- Copy the connection information at the top of the Summary text to the clipboard, as this information will be used in step 4c.
- Click the Finished button to return to the main dialog.
- From the File menu, choose Close Database and then Exit.
Step 3: (SQL Server Administrator task) Start the SQL Server Service
Estimated Time: 10 minutes
This example assumes you will be using a local copy of SQL Server for the SQDR control database. If you do not already have a SQL Server installation, you can obtain the Microsoft SQL Server Express Edition free of charge from Microsoft to use as a control database for the Data Replicator. Review the SQL Server considerations above for more information.
Start SQL Server Service
The SQL
Server service must be running for the Data Replicator Service to access its control
database. Start the SQL Server service from Windows Services, typically found under Control
Panel—> Administrative Tools—> Services.
If you have not already done so, create a SQL Server database (we recommend using the name ControlDB) and verify that you understand the credentials needed to access the database.
Step 4a: (Tier 3 Administrator task) Install the StarQuest Data Replicator Software
Estimated Time: 10 minutes
The StarQuest Data Replicator software is distributed as a compressed file that you download from the StarQuest Ventures Web site.
- Log on as an Administrator.
- Download SQDR using the download link provided by StarQuest Support, unblock the zip file if necessary (right-click and select Properties of the zip file), and uncompress the file into a temporary directory.
- Run the setup.exe program from the SQDR installer image.
- Respond to the prompts accordingly to complete the installation.
At the end of the installation, the installer prompts you to start the ODBC Administrator and/or the SQDR Configuration. Select the option to run SQDR Configuration and proceed to the next step.
Step 4b: (Tier 3 Administrator task) License the StarQuest Products
Estimated Time: 5 minutes
StarQuest products require a valid set of licenses for both evaluation and production purposes.
- Open the StarLicense Configuration utility from Start --> Programs --> StarQuest Data Replicator --> License Configuration.
- Under the Licenses tab, click the Add button and record the Node ID.
- Supply the Node ID to StarQuest support, who will generate the necessary licenses.
- Enter the supplied licenses on the Add dialog. Repeat until all of the license keys have been entered. Depending on the type of deployment, there will 2 to 4 licenses.
- Restart any running StarQuest services (SQDR, StarPipes, StarLicense Server) or any applications using StarSQL.
Step 4c: (Tier 3 Administrator task) Install ODBC drivers for source and destination
Estimated Time: 5 minutes
You must have ODBC drivers for each source and destination type. In our example below, we will be using StarSQL to access an IBM Db2 for i source; StarSQL is already installed as part of the SQDR installation. For a SQL Server destination, use the latest version of Microsoft ODBC Driver 17 for SQL Server..
Step 4d: (Tier 3 Administrator) Configure the StarQuest Data Replicator Service
Estimated Time: 10 minutes
You must configure the Data Replicator service to create the control database tables.
- If the SQDR Configuration Wizard is not already running, launch it from the SQDR program group: Start—>Programs—>StarQuest Data Replicator—>Data Replicator Configuration.
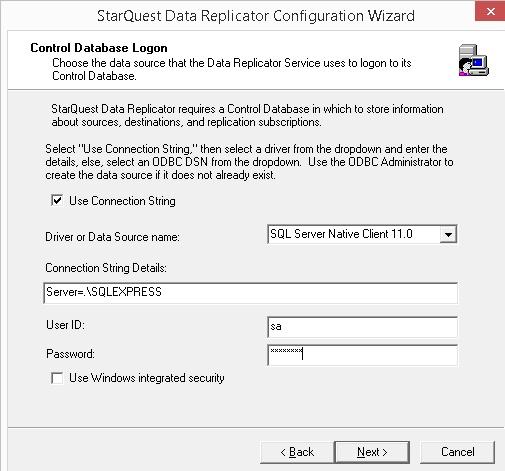
- On the Control Database Logon panel, you can specify whether to use a connection string or an ODBC data source to connect to the SQDR control database. We will be using a connection string.
- Assuming you have installed a named instance of SQL Server Express on the local system, choose ODBC Driver 17 for SQL Server from the ODBC driver dropdown and enter SERVER=.\SQLEXPRESS for the connection string. Enter the SQL Server credentials for a user who is a member of the sysadmin server role. Click Next to proceed.
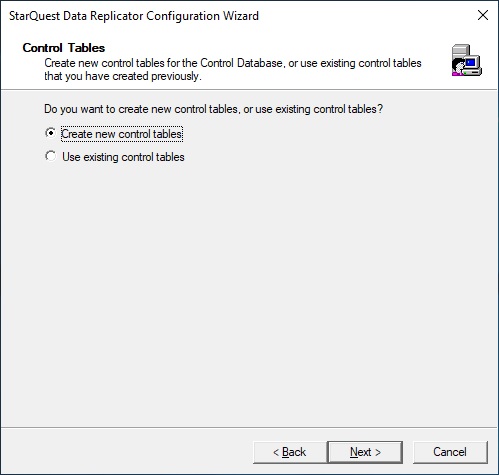
- On the next panel, select the option Create new control tables and click Next.
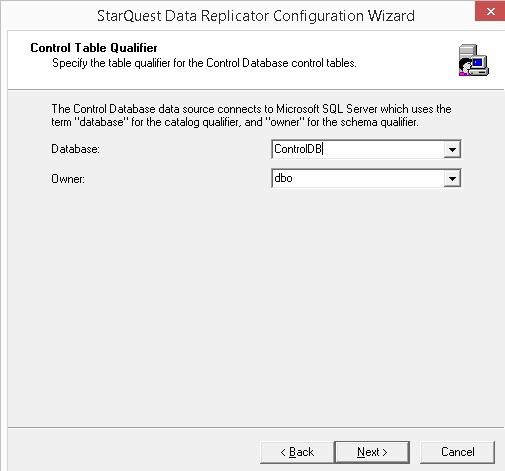
- On the next panel, enter a database name of ControlDB (assuming you have created a database named ControlDB). Leave the schema name at its default of "dbo". Click Next.
- Continue clicking Next, accepting defaults for the remaining panels. Select Automatic as the Service Startup Type and choose the Local System Account as the Log On As user. If you would like to change the Data Replicator service properties, we recommend doing this in Windows Services once the SQDR configuration has been completed. Click Next.
- Review the configuration summary, choose to start the Data Replicator Service and Manager and click Finish to save the Data Replicator configuration.
Step 4e: (Tier 3 Administrator) Start the Data Replicator Manager and Create a Subscription
Estimated Time: 10 minutes
You use the Data Replicator Manager to set up and administer replication operations.
The example below demonstrates creating a replication from IBM Db2 for i (using the StarSQL ODBC driver) to Microsoft SQL Server (using the ODBC 17 Driver for SQL Server). To replicate between other DBMS types, make sure that you have installed an appropriate ODBC driver (the installation of SQDR includes a number of ODBC drivers). Refer to the Using Connection Strings topic of the Data Replicator Manager help file (under Working with Sources) for connection string examples for various DBMS types.
Define a Source
To define the source data that you want to replicate:
- In the main Data Replicator Manager window, right-click the Sources folder and select the Insert Source command.
- Create a source using connection strings:
- Select the ODBC Driver radio button.
- Select StarSQL (64-bit) from the list of ODBC drivers.
- The ODBC driver name will appear in the Source Name field. Be sure to modify this name to clearly identify the database; the name cannot be changed after it is saved. In our example, we are naming it DB2.
- Enter a valid connection string (maximum 254 characters). For StarSQL, the connection string will look like
Server=MYRDB;HostName=myhostip;Port=446;IsolationLevel=2;PkgColID=SQDR;QryBufSz=8192000;
Note that IsolationLevel=2 is required for a Db2 for i source.
If you have chose to bind packages in QGPL rather than create a library named SQDR, specify PkgColID=QGPL. Note that you may need to specify Isolation Level=0 if the source tables are not journaled. - Enter a user ID and password that has permission to access that database.
- Click on the Advanced tab.
- On the Advanced dialog, set the default values for Database and/or Object Schema, as appropriate for your database. These values are necessary for the Copy Member operations.
- Click OK to create the source.
Define a Destination
Now define the destination that will receive the replicated data.
- Right-click the Destinations folder and select the Insert Destination command.
- Create a SQL Server destination using connection strings:
- Select the ODBC Driver radio button.
- Select ODBC 17 for SQL Server from the list of ODBC drivers (this driver is now recommended rather than the Native Client shown in the screen shot)
- The ODBC driver name will appear in the Destination name field. Be sure to modify this name to clearly identify the database; the name cannot be changed after it is saved. In our example, we are naming it SQL Server.
- Enter a valid connection string (maximum 254 characters). For SQL Server, the connection string will look like Server=MYHOST\MYINSTANCE.
- Enter a user ID and password that has permission to access that
database.
- Click the Advanced tab.
- On the Advanced dialog, set the default value for the Database and/or Object Schema, as appropriate for your database. These values will be used by the SQDR subscription wizard to populate configuration fields and during Copy Member operations.
- Click OK to create the destination.
Create a Subscription
The Replicator Manager provides a Subscription Wizard to help you define the specific source data and how you want to replicate it.
- Right-click the Subscriptions folder beneath the source that you added and select the Insert Subscription command. The Add Subscription Wizard appears.
- In the Select the Source pane, select Snapshot as the Replication Type (rather than Incremental as shown in the screenshot below) and enter a schema or object name if you want to filter the source objects list. Click the Refresh button to display the available source objects in the right pane and select the source object you want to replicate. Click Next to proceed.
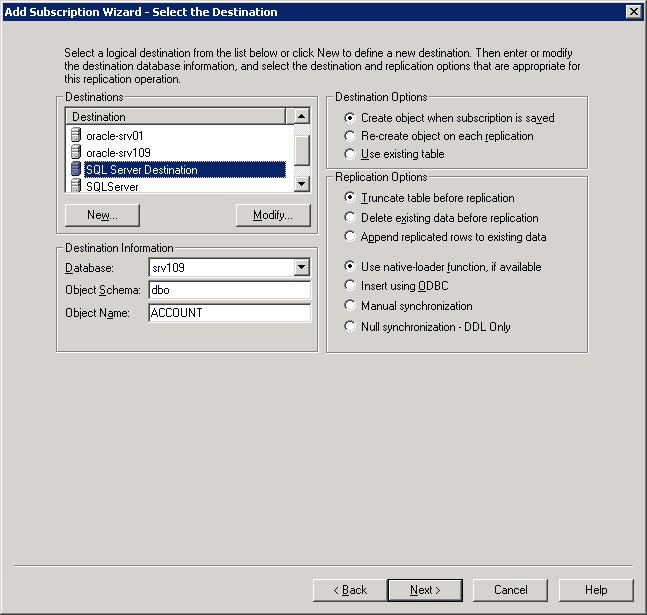
- In the Select a Destination pane, select the
destination you added to the Replicator Manager. Review the Destination Options
and Replication Options, and click Next to proceed.
- In the Select Group pane, optionally select to add the subscription to an existing group or to a new group. Click Next to continue.
- The Define Criteria pane allows you to specify a SQL WHERE clause in order to horizontally partition the data to be replicated. Enter a valid WHERE clause or leave the field blank. Click the Verify Criteria button to verify access to the table and that the number of rows to be returned are in the expected range. Click Next to continue.
- The Define Destination Columns pane allows you to review and change the data type mappings for the source and destination objects. If desired, modify the data types of the destination table by selecting one or more columns (use shift-click or control-click to select multiple columns), select Modify Column, make the desired change, and click OK. Click Next.
- Click Next in the Create Statement pane. The CREATE TABLE statement will not appear until the subscription has been saved.
- On the Define Processing pane, enter optional host commands to be executed before and/or after the data is replicated. Click Next to continue.
- On the Indexes/Constraints pane, click Refresh to display any indexes or constraints defined for the source. Select any that you want to replicate to the destination and click Next.
- On the Define Replication Schedule pane, configure a schedule for the subscription or leave the Scheduled box unchecked. Click Next to continue.
- Review the default subscription name provided and, if desired, modify. Click Finish to save the subscription.
The subscription is added beneath the Subscriptions folder of the defined source and to the corresponding group.
Run the Subscription
Right click the newly created subscription and choose Run to start the replication.
Step 4f: Review the Subscription Status
Estimated Time: less than 5 minutes
- Review
the status of the subscription by highlighting the subscription in the left
pane of the Replicator Manager.

- Double-click
the replication event, indicated by the
 icon, to view the
statistics of the replication. If the data did not replicate successfully,
review the error(s) and take the necessary steps to address the problem.
icon, to view the
statistics of the replication. If the data did not replicate successfully,
review the error(s) and take the necessary steps to address the problem.
Continuing Your Software Evaluation
This Quick Start Guide was intended to help you install the StarQuest software and perform a data replication operation as quickly as possible. Please continue to experiment with the software by adding additional subscriptions, scheduling replication operations, and performing SQL operations on data before and/or after it is replicated. As you experiment with the SQDR software, refer to the product documentation for more information.
- The Data Replicator Manager provides an online help system that provides more information about defining and running replication operations. Press F1 or click a Help button from the Data Replicator Manager to display the online help system.
If you encounter any problems while using the evaluation software, please open a support ticket at http://support.starquest.com or call +1 415.669.9619 for assistance.
DISCLAIMER
The information in technical documents comes without any warranty or applicability for a specific purpose. The author(s) or distributor(s) will not accept responsibility for any damage incurred directly or indirectly through use of the information contained in these documents. The instructions may need to be modified to be appropriate for the hardware and software that has been installed and configured within a particular organization. The information in technical documents should be considered only as an example and may include information from various sources, including IBM, Microsoft, and other organizations.